How to Install IIS on Windows and Map it to Match Data Pro
Part 1: Install IIS on Windows Server
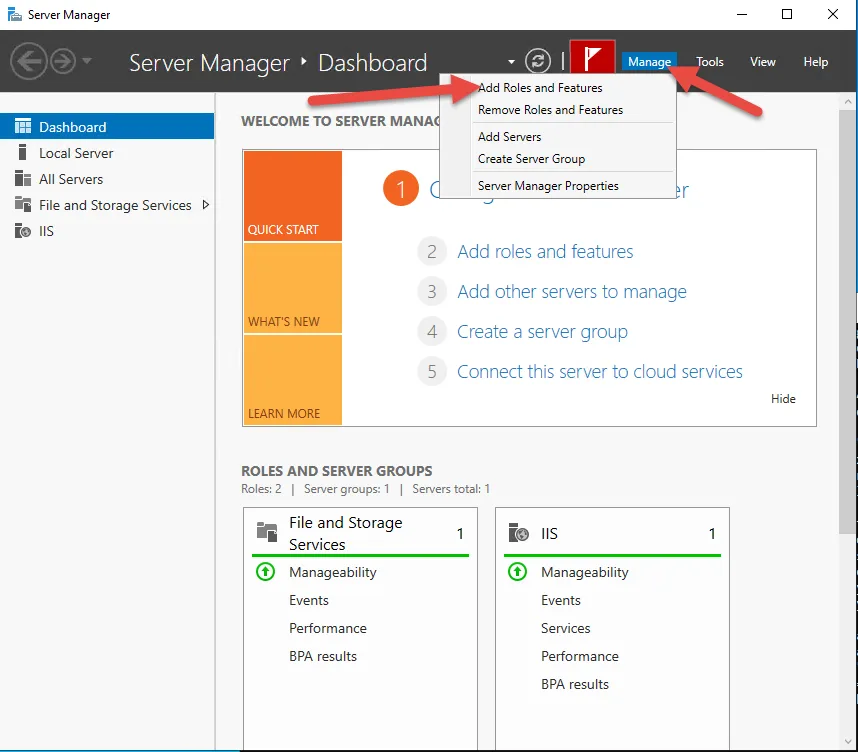
Open Server Manager (it usually opens automatically on startup)
Click “Add roles and features”
Click “Next” through the “Before you begin” screen
Select “Role-based or feature-based installation” and click “Next”
Select your server from the server pool and click “Next”
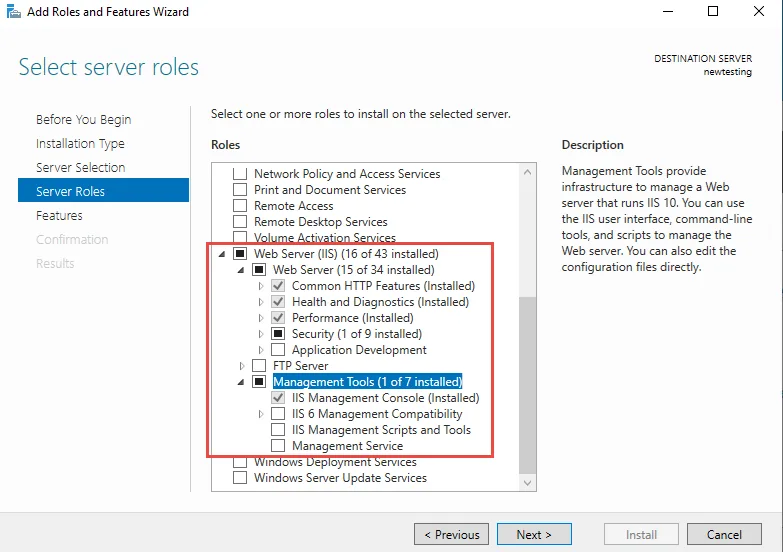
Check “Web Server (IIS)”
When prompted, click “Add Features” to include management tools
Click “Next” through the Features screen
On the Web Server Role (IIS) page, click “Next”
Select these additional role services:
- Under Application Development: check ASP.NET 4.8 and WebSocket Protocol
- Under Common HTTP Features: all items should be selected by default
- Under Health and Diagnostics: check HTTP Logging and Request Monitor
- Under Performance: check Static Content Compression and Dynamic Content Compression
- Under Security: check Request Filtering
Click “Install” and wait for installation to complete
Click “Close” when finished
Open a browser and navigate to
http://localhostto verify IIS is running (you should see the IIS welcome page)
Part 2: Install URL Rewrite and Application Request Routing Modules
- Download URL Rewrite Module from: https://www.iis.net/downloads/microsoft/url-rewrite
- Run the installer and follow the prompts to complete installation
- Download Application Request Routing (ARR) from: https://www.iis.net/downloads/microsoft/application-request-routing
- Run the installer and follow the prompts to complete installation
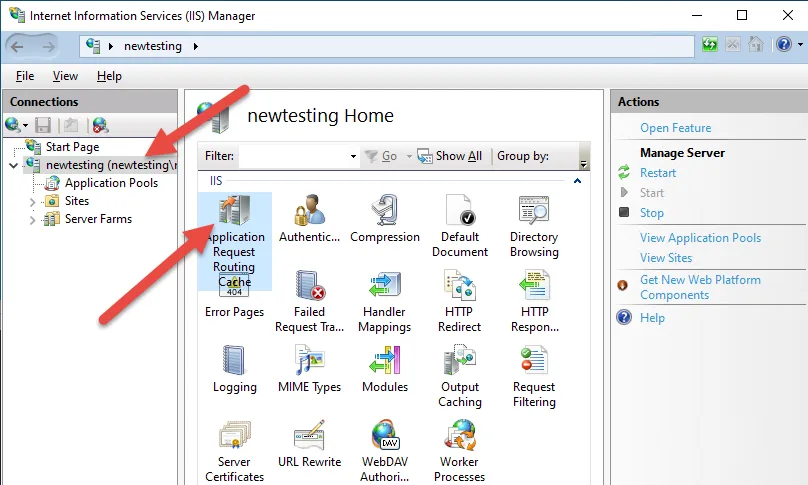
- Open Internet Information Services (IIS) Manager (Start → Internet Information Services (IIS) Manager)
- Click on your server name in the left tree (top level, not any site)
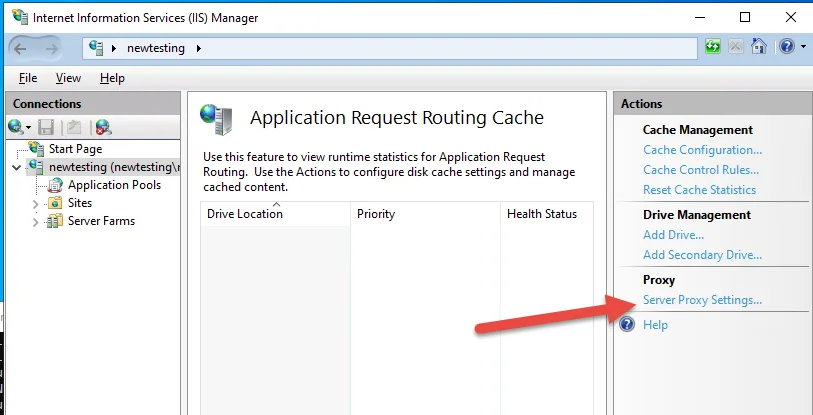
- Double-click “Application Request Routing Cache”
- Click “Server Proxy Settings” in the right Actions panel
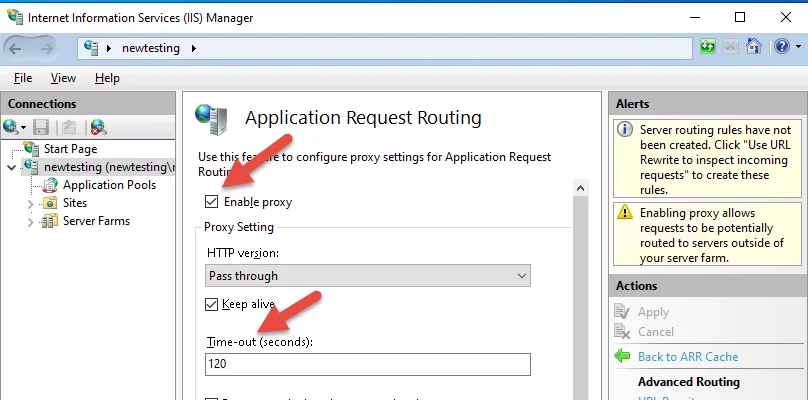
- Check the box “Enable proxy”
- Set Time-out to 120 seconds
- Click “Apply”
Part 3: Remove the Default Web Site
- In IIS Manager, expand “Sites” in the left panel
- Right click on “Default Web Site”
- In the menu that pops up select “Remove”
Part 4: Create Your New IIS Site
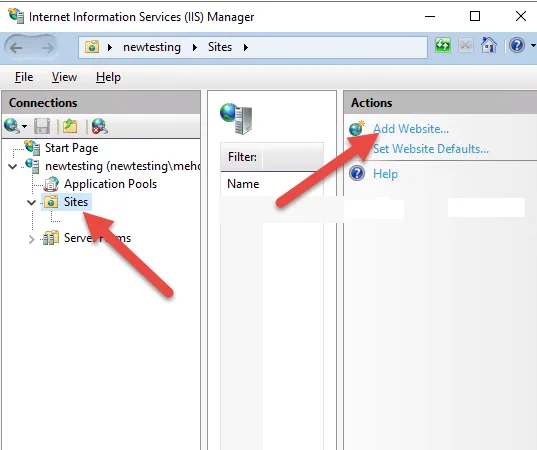
- Select “Sites” in the left panel and select “Add Website” on the right panel
- Enter the following information:
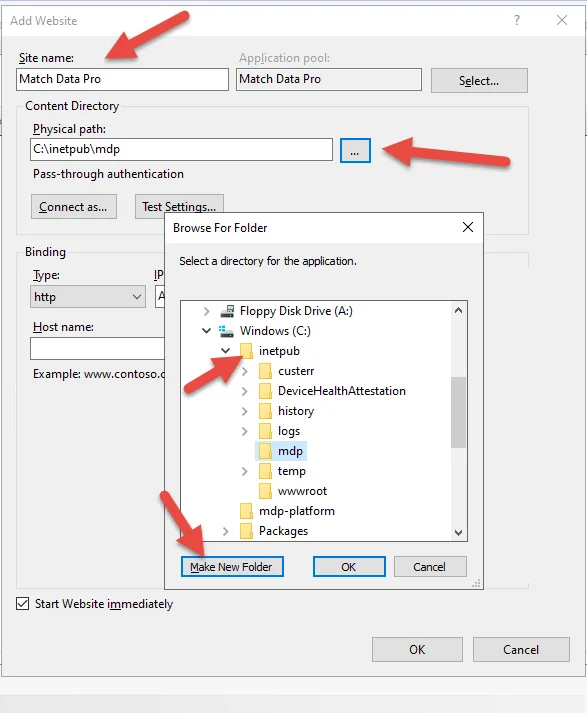
- Site name: Match Data Pro (or your preferred name)
- Physical path: Click the “…” button and create a new folder at
C:\inetpub\mdp, then select it - Binding – Type: http
- Binding – IP address: All Unassigned
- Binding – Port: 8081
- you can use another port of your choosing as long as it is not in use
- Binding – Host name: leave blank
- Click “OK”
Part 5: Get Your WSL2 IP Address and Docker Port
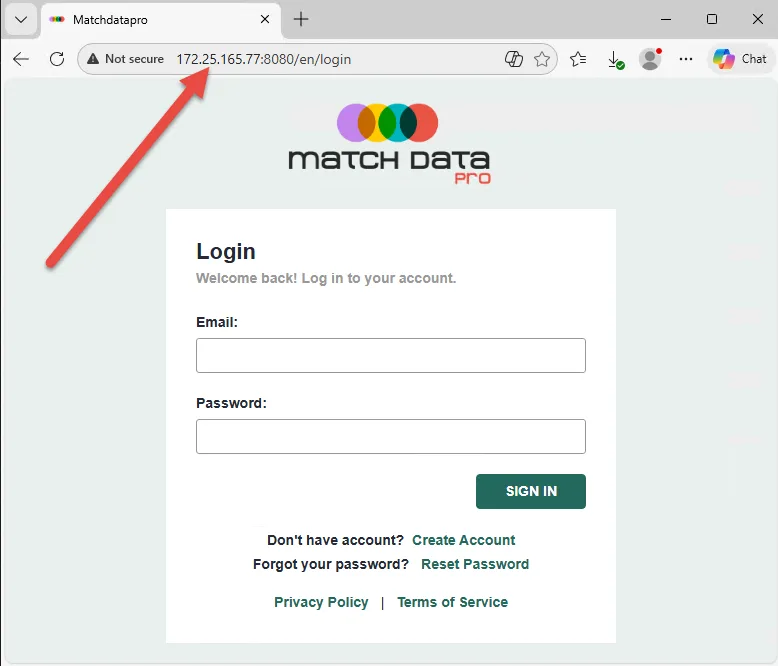
- Open the browser where the Match Data Pro login screen is loaded
- Look at the full address in the address bar — it will read something like
http://172.25.165.77:8080 - Note both values:
- IP address (example:
172.25.165.77) - HTTP port (example:
8080) — this is the port the MDP web app listens on inside WSL2
- IP address (example:
- The socket server runs on the same IP at port 8085. You will need this in Part 8.
Note: The external IIS port you set in Part 4 (8081) is separate from these WSL2 ports. Users connect to IIS on 8081; IIS forwards internally to the WSL2 ports (8080 for the app, 8085 for the socket server).
Part 6: Configure URL Rewrite Rule for Reverse Proxy
- In IIS Manager, click on your new site (“Match Data Pro”) in the left panel
- Double-click “URL Rewrite” in the middle section
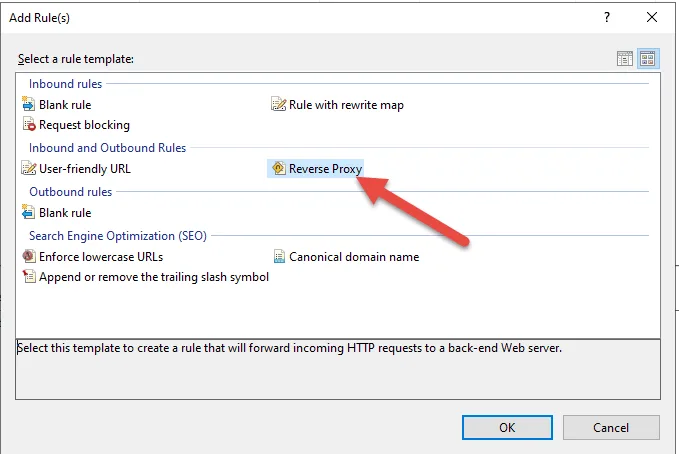
- Click “Add Rule(s)” in the right Actions panel
- Select “Reverse Proxy” and click “OK”
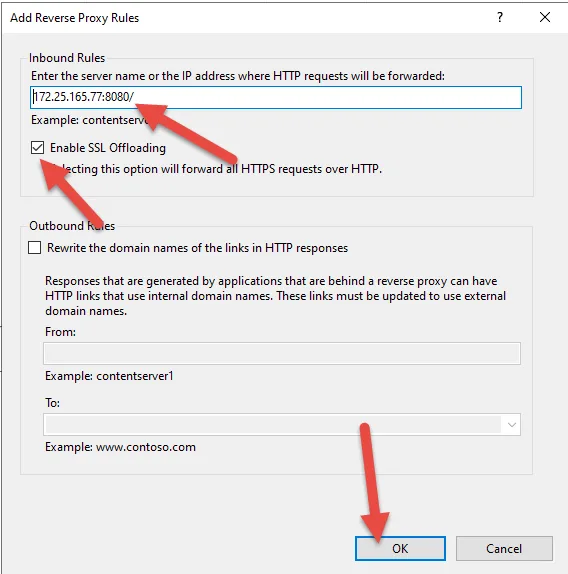
- In the “Inbound Rules” field, enter the WSL2 IP including the HTTP port from Part 5, for example:
-
172.25.165.77:8080- ⚠️ Do not enter the bare IP. Without the
:8080, the proxy defaults to port 80 and the connection will fail.
- Click “OK”
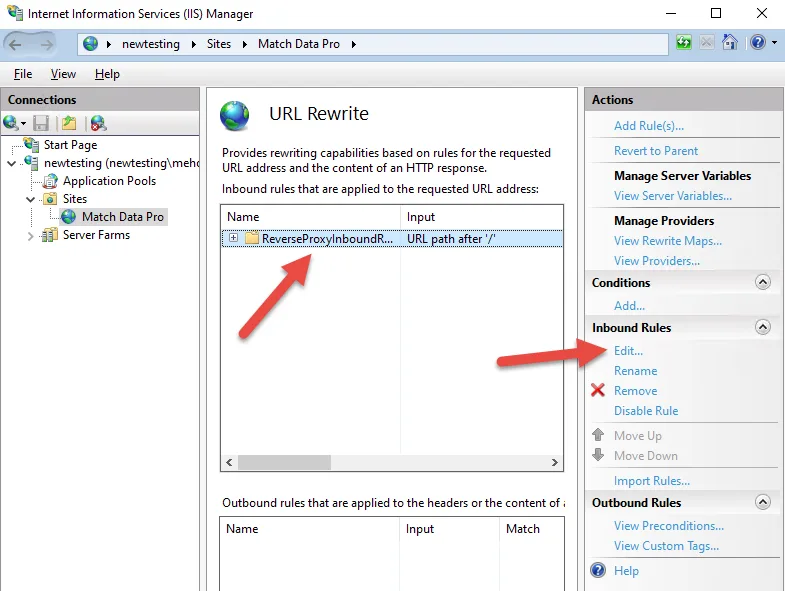
- Select the newly created rule and click “Edit” in the right panel
- Confirm the Rewrite URL reads:
-
http://172.25.165.77:8080/{R:1}- (substitute your own IP; the
:8080and/{R:1}must be present)
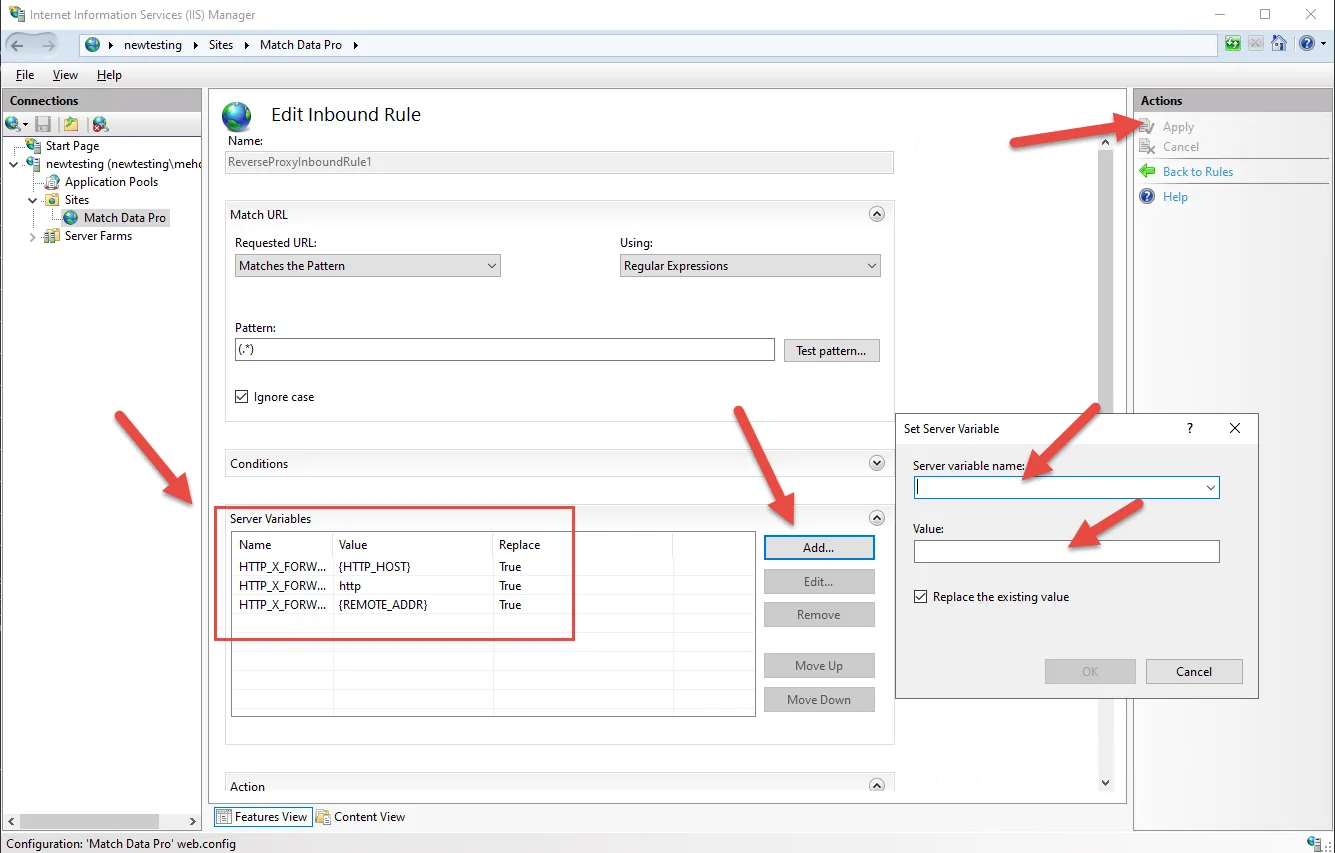
- Locate the Server Variables section and click Add to create the following 3 server variables:
-
- Nombre:
HTTP_X_FORWARDED_HOST— Value:{HTTP_HOST} - Nombre:
HTTP_X_FORWARDED_PROTO— Value:http- use
httpsif you will serve the site over HTTPS
- use
- Nombre:
HTTP_X_FORWARDED_FOR— Value:{REMOTE_ADDR}
- Nombre:
- Click “Apply” in the right Actions panel
Part 7: Enable Server Variables at Server Level
- Click “Back to Rules” in the right Actions panel to return to IIS Manager
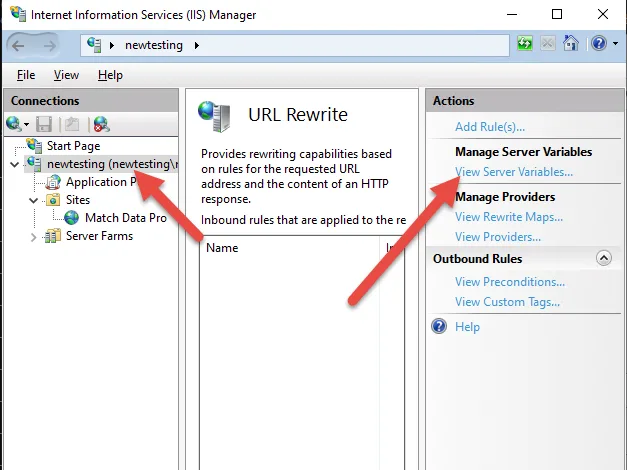
- Click on your server name (newtesting) in the left tree at the TOP level (not the Match Data Pro site)
- Double-click “URL Rewrite”
- In the right Actions panel, click “View Server Variables”
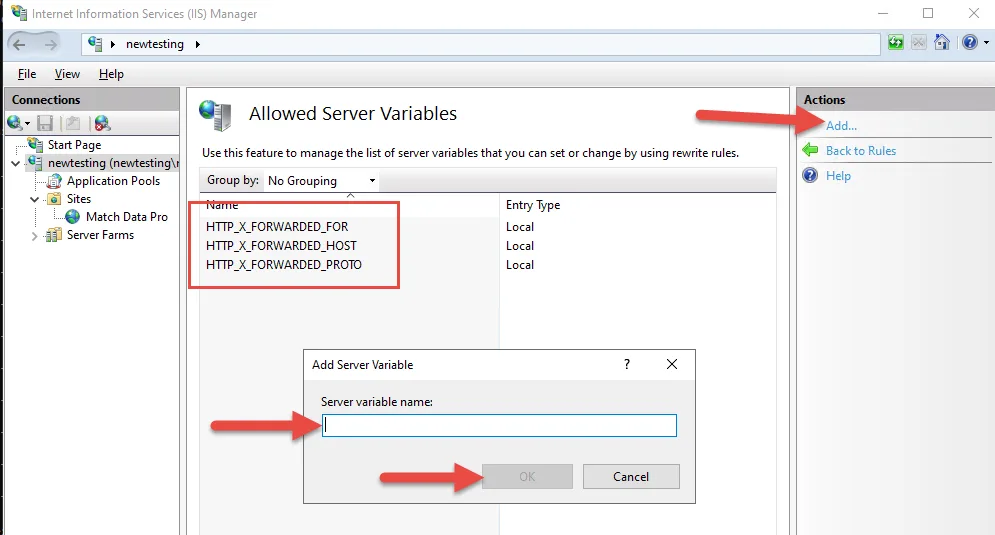
- Click “Add” to add the first server variable:
- Server variable name:
HTTP_X_FORWARDED_HOST - Click “OK”
- Server variable name:
- Click “Add” again for the second variable:
- Server variable name:
HTTP_X_FORWARDED_PROTO - Click “OK”
- Server variable name:
- Click “Add” again for the third variable:
- Server variable name:
HTTP_X_FORWARDED_FOR - Click “OK”
- Server variable name:
- Click “Back to Rules” in the right Actions panel
Part 8: Add a Reverse Proxy Site for the Socket Server (Port 8085)
The socket server runs separately inside WSL2 on port 8085 and must be proxied with its own site. The prerequisites are already in place from earlier parts:
- WebSocket Protocol feature — installed in Part 1, step 10. ARR forwards WebSocket upgrade requests automatically once this feature is present; no extra rule is required.
- ARR proxy enabled — done in Part 2.
- In IIS Manager, select “Sites” in the left panel, then “Add Website” on the right
- Enter the following:
- Site name: Match Data Pro Socket
- Physical path: click “…”, create a new folder at
C:\inetpub\mdp-socket, then select it - Binding – Type: http
- Binding – IP address: All Unassigned
- Binding – Port: 8085
- Binding – Host name: leave blank
- Click “OK”
- Select the new “Match Data Pro Socket” site → double-click “URL Rewrite”
- Click “Add Rule(s)” → select “Reverse Proxy” → “OK”
- In the “Inbound Rules” field, enter the WSL2 IP with the socket port, for example:
172.25.165.77:8085
- Click “OK”, then select the new rule and click “Edit”
- Confirm the Rewrite URL reads:
http://172.25.165.77:8085/{R:1}
- In the rule’s Server Variables section, add the same three variables as in Part 6:
HTTP_X_FORWARDED_HOST={HTTP_HOST}HTTP_X_FORWARDED_PROTO=http(orhttps)HTTP_X_FORWARDED_FOR={REMOTE_ADDR}- (these are already registered at the server level in Part 7, so no additional server-level step is needed)
- Click “Apply”
After this, the MDP frontend’s socket configuration (
SOCKET_API_LINK) must point to the external socket URL:http://YourServerIP:8085. Usehttpsif you serve over TLS.
Part 9: Restart IIS
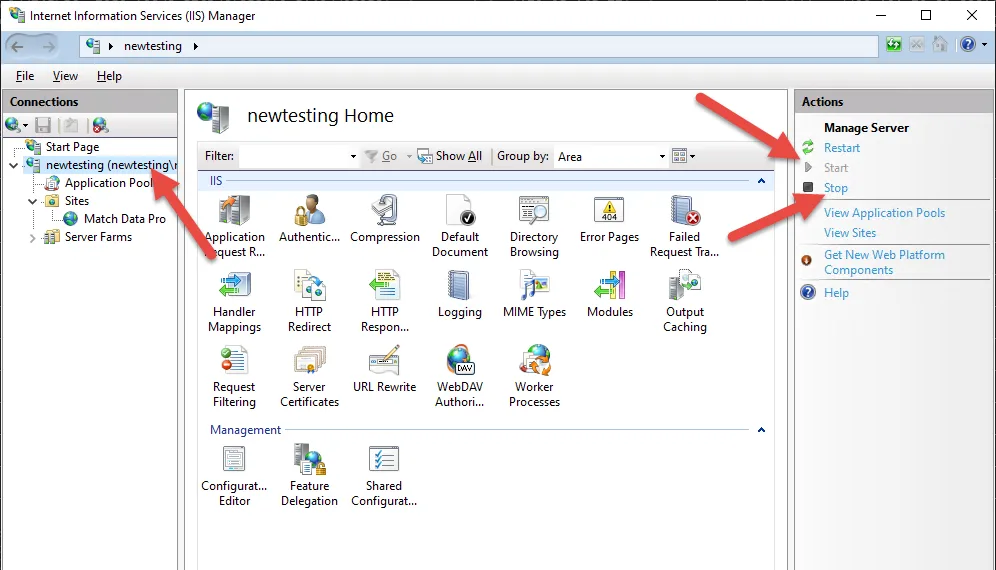
- In IIS Manager, click the server name at the top level
- Select “Stop” from the right panel menu
- Wait 3–5 seconds
- Select “Start” from the right menu
- From a browser outside the server, verify both endpoints:
- Web app:
http://YourServerIP:8081(or the external port you configured in Part 4) - Socket server:
http://YourServerIP:8085
- Web app: